Beginners Guide to Skipping
Here you can find everything you need to get started with jumping rope.
WHY IS JUMPING ROPE SO GOOD FOR YOU
1️⃣ Highly Effective❗️
10 minutes of jumping rope has been proven to be just as effective, if not more so, than 30 minutes of running. The study was conducted at Arizona State University and found an equal level of improvement in cardiovascular gain between 92 male athletes divided into two groups; one group jumped rope for 10 minutes a day and the other ran for 30 minutes a day over a period of 6 weeks.
2️⃣ Tones your whole body❗️
Jump rope activates the leg muscles, but it also tones your shoulders, back, chest, arms and abs. Each time you bring your foot off the ground, you’re engaging your core muscles without having to do one sit up or plank.
3️⃣ Develop all round athletic abilities❗️
Helps to improve your speed, hand eye coordination, timing, reflexes, balance and posture. Many athletes of other sports use jump rope to supplement their training because of this.
4️⃣ Low Impact❗️
Jump rope is actually used to help athletes recover from joint injury this is because skipping is a high intensity but low impact sport. When performed correctly, with low bounces from the balls of the feet, jumprope has a lower impact on your joints than jogging or running, not only minimising ankle and knee injuries but actually aiding them in recovery by building the muscles in the ankles and knees that support the ligaments surrounding the joint.
5️⃣ Portable and affordable❗️
A jump rope is super compact and portable allowing a workout to happen anywhere; at home, at the gym or event at a local park and many other public spaces. The low price point makes jump rope an affordable and inclusive workout option that is designed for everyone and particularly great when you don’t have access to a gym or large space. 💪🏻
6️⃣ It’s good for your brain ❗️
Having to coordinate so many different parts of your body increases the activity in your brain. Jump rope has been proven to improve memory, alertness, concentration and reading skills. Currently there are studies investigating the benefits of jumprope in staving off dementia.
7️⃣ It’s Fun!!! 🎉
Jumping rope is one of the most fun and creative forms of fitness available. It’s easy to do to your favourite music, with children, friends or even as a form of meditation. Most people report that they barely realise they’re working out!
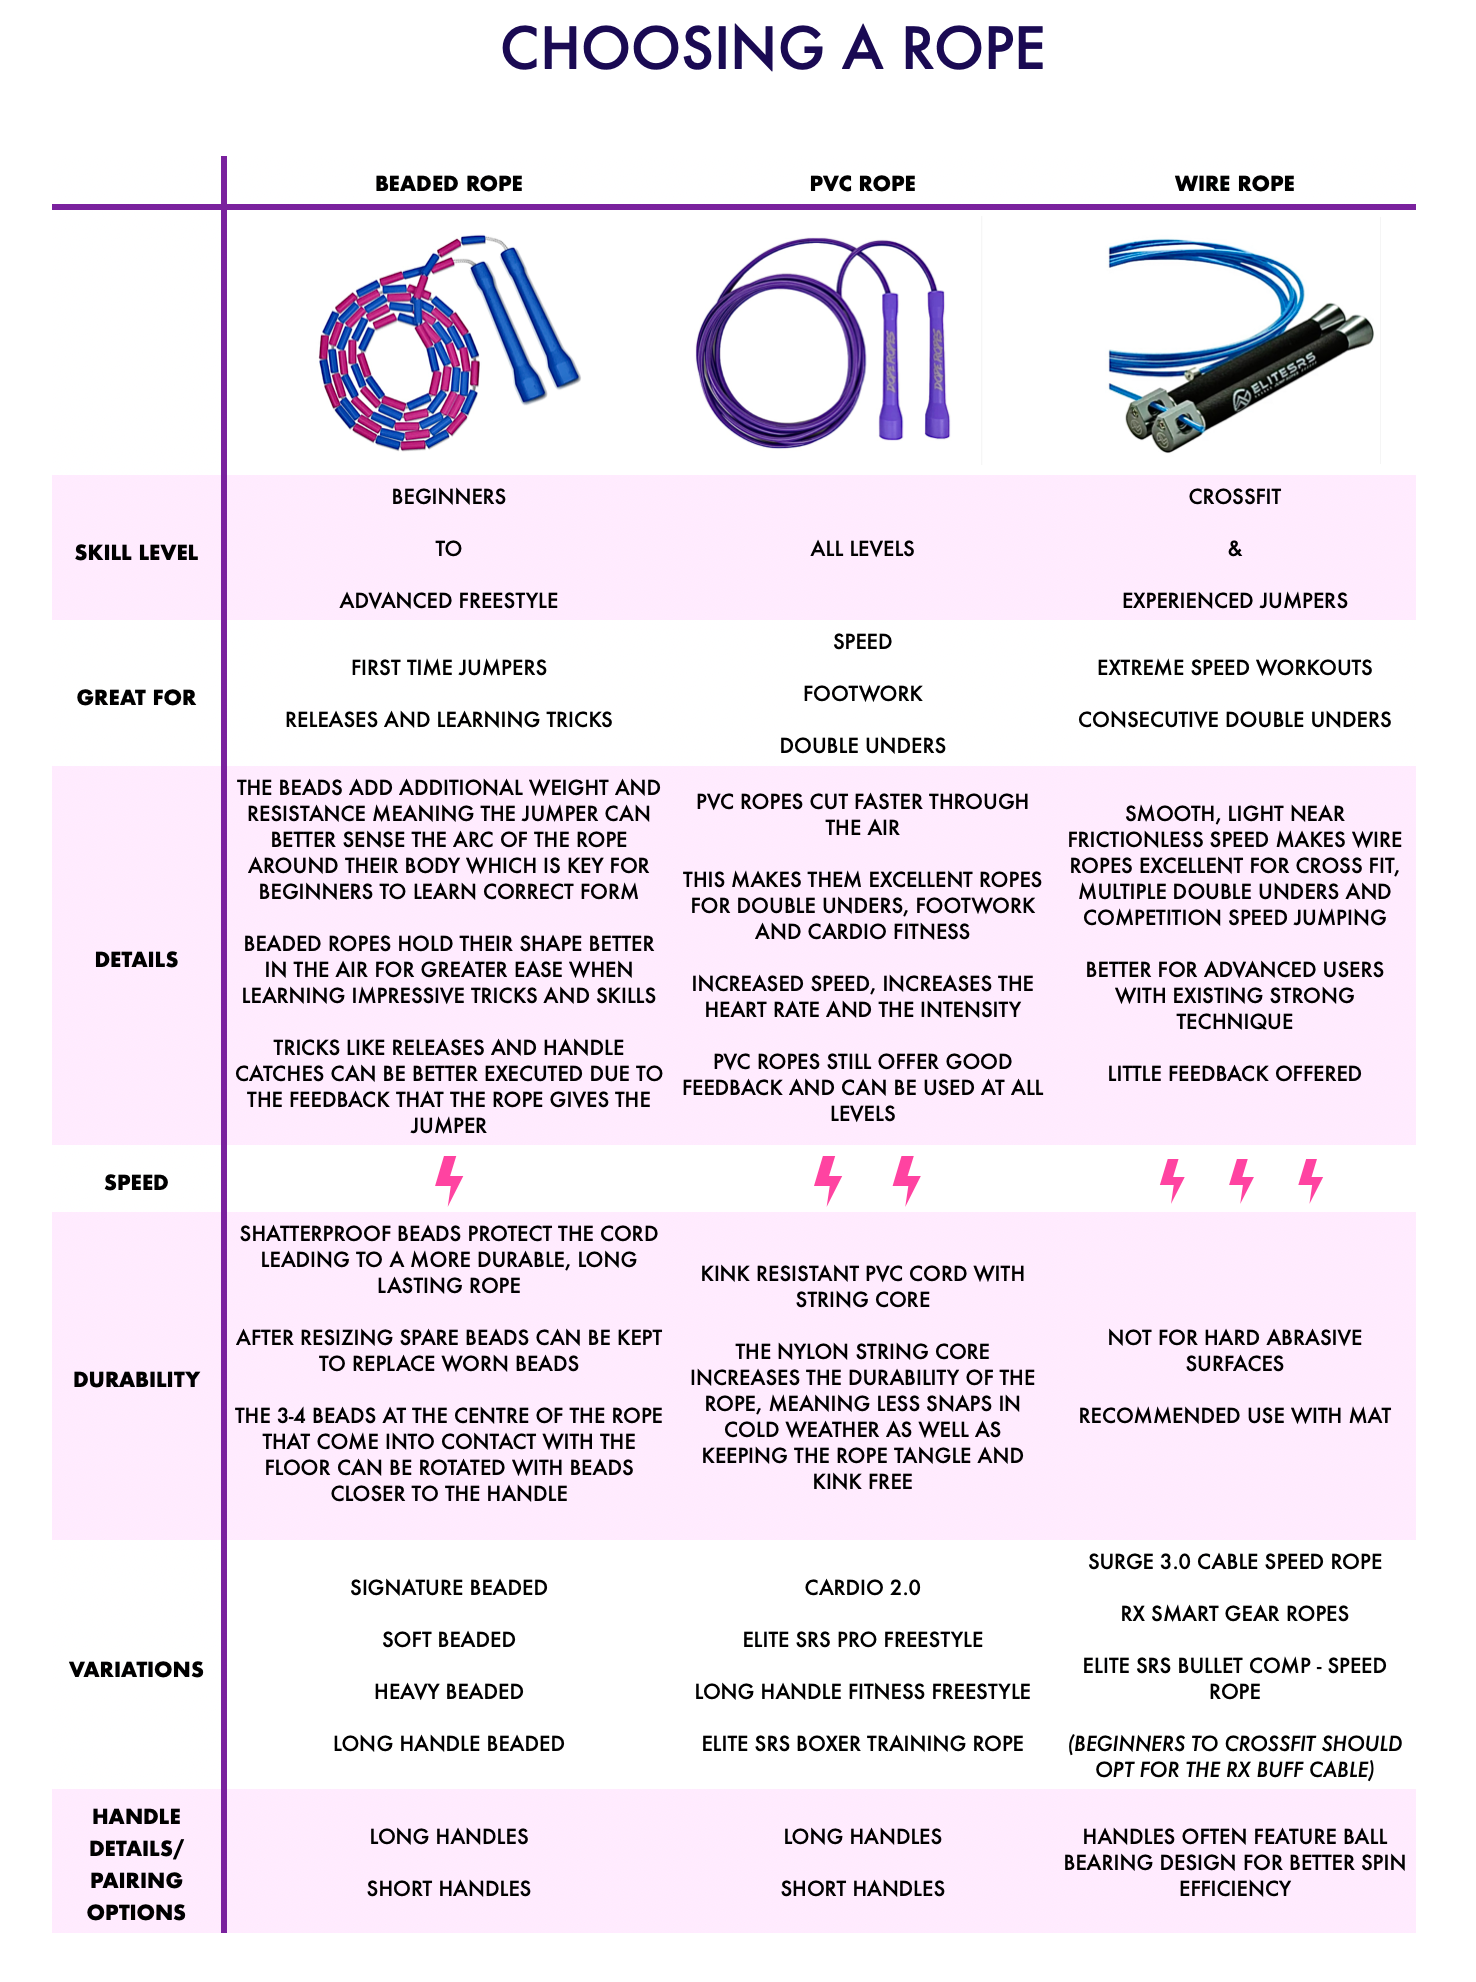
Choosing A Rope
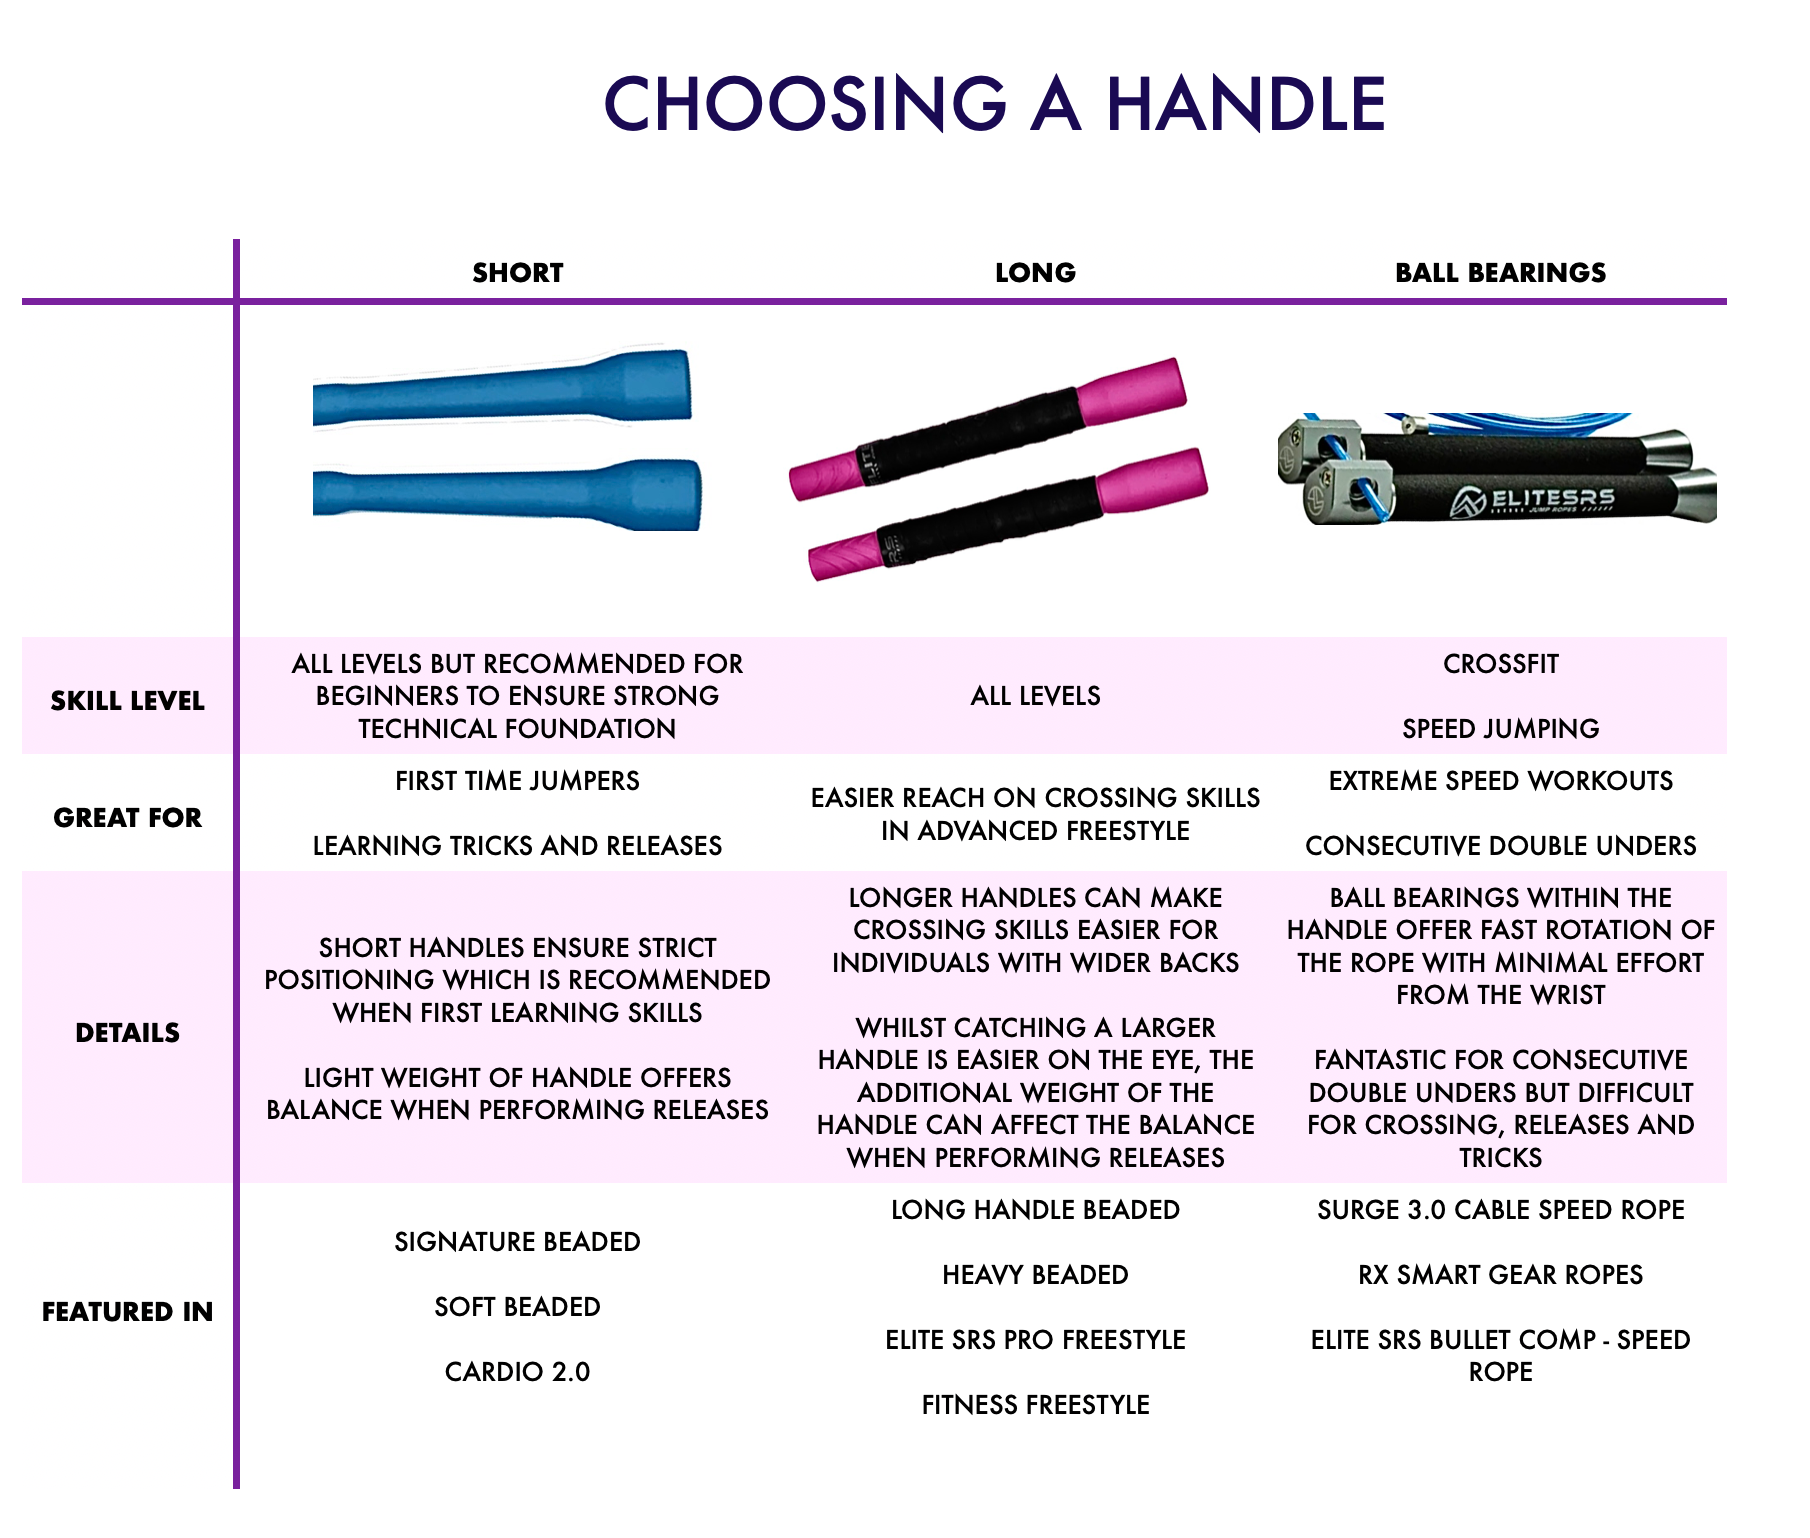
Choosing Handles
Choosing between short or long handles is a personal preference with benefits to all options. See here to decide which makes the most sense for you!
Measuring and Resizing Your Rope
How long should your rope be?
A common mistake is having a rope that’s too long which leads to users having their arms too wide to compensate for the excess rope which leads to poor form (see form section further down in this guide). However, optimal rope length also depends on height, skill level, objective and personal preference.
Generally, a shorter rope is considered most suitable for more advanced jumpers but this can also be down to personal preference as there are highly advanced jumpers who simply prefer a longer rope. All efforts should be made to use a shorter rope over time and if your technique allows, you should shorten your rope further.
As a beginner, starting off with a rope with enough room for error is the way to go in order to acclimatise to the new skill but consider progressive shortening in order to improve your efficiency and technique over time. We see a good starting point of rope length being around height plus 3ft, see more below.
To check the size you need:
Stand on your rope at the centre and see where you would like the handles to come up to on your body (see video illustration below),
A good gauge is:
Beginners - bottom of handles end at chest height (this should leave the rope length between the handles at around your height plus 3ft)
Intermediates - bottom of handles end at waist height (this should leave the rope length in between the handles at around your height plus 2ft)
Advanced - bottom of handles end at hip height (rope length between the handles at around your height plus 1ft - only used by very few jumpers and more for the application of efficient speed steps and competition)
As mentioned above, your objectives and the jump rope style being performed will also dictate the optimal rope length for you. When changing length, make small changes rather than big jumps as this will help with progression.
For most applications in freestyle jumping, having a middle ground between efficiency and room for error is most common. Most freestyle jumpers with some experience will be at around the height plus 2ft mark allowing the performance of wide variety of skill types including wraps, double unders and releases without too much excess rope.
In addition, with time and as you jump more consistently, you will likely have more than one rope where one of ropes is very strict on length so you can perform certain skills efficiently and at speed. Whilst the 2nd rope may have 3-5 inches extra length which you can use for training new skills that you are less proficient at. Having a main rope and training rope is something which regular freestyle jumpers tend to obtain in the course of their jump rope journey.
Note - if you want to go faster and do faster mic releases, then shorter ropes will help with this!
Once you are happy with your length, you can remove the excess beads or cut your PVC rope to the size you need.
How to resize your rope once you’ve measured
Now you know how long you need/want your rope it’s time to resize.
Beaded and PVC ropes have slightly different methods. You can also check out our resizing videos for each style below
|
Beaded |
PVC |
|
Pull the cord from the top of the handle |
Pull the cord from the top of the handle |
|
Untie the knot |
Unclip the plastic snap clasp |
|
Remove the washer |
Pull the cord through until you reach desired rope length based on measuring |
|
Remove the handle |
Reclip the plastic snap clasp to secure in place |
|
Remove the excess beads (you can keep these as replacements if needed!) |
Cut excess cord once you are comfortable with the length |
|
Replace the handle |
|
|
Thread the washer back on |
|
|
Retie a knot above the washer |
|
|
Cut excess cord once you are comfortable with the length |
Note - any frayed polyester cord after cutting can be tidied up and sealed using the flame from a lighter or match to carefully neaten and give a clean finish. This will also prevent knots from coming loose.
THE FUNDAMENTALS OF JUMP ROPE (WHAT TO DO AND NOT TO DO!)
1) Bounce Low
- You only need to jump high enough for the rope to clear just under your feet, look at your rope and make a note of it’s thickness and consider this when jumping. Try and focus on jumps no higher than three inches.
- Keeping bounces low will limit the impact on your joints and reduce the risk of injury and fatigue.
- A good way to protect your ankles is to focus on jumping in the same spot and not stray sideways or forwards!

2) Stay on the balls of your feet with only a slight bend in the knees
- Jump from the balls of your feet with heels off the ground (This is called a bound and will engage the correct muscle for proper jump rope technique)
- Keep your knees slightly bent.
- Avoid kicking feet back as you leave the ground.

3) Hand positioning is key
- You want to make sure your elbows are pointing behind you with your hands close to your body, next to your hips. This is called the home position. Jumping with arms wide and straight makes things difficult. Though the home position may feel unnatural at first, the elbows set back drives the rotation in the wrists which reduces unnecessary shoulder fatigue.
- This positioning also allows for as short a rope length as possible to be used which leads to a more efficient rope movement.

4) Wrist Rotation
- Rotate the wrists and avoid leading the rotation with your arms

5) Shorten your rope
- Many beginners use a rope that is far too long because they initially feel it’s easier to jump over, however, this can lead to poor form, incorrect hand positioning, kicking back and potential injuries.
- Shorter rope lengths lead to better mechanics and efficiency of rope spin leading to cleaner technique and execution of skills.
- We recommend shortening your rope as much as technique allows and continue to review and shorten with time and confidence.
6) Use the correct rope type
- Avoid light cables and weighted handles which don't have the correct amount of feedback or have a weight imbalance.
- The best way to feel the weight of the rope around you is to use a beaded rope or alternatively, a 5mm PVC rope.
- The value of feeling the rope’s weight is the reason CrossFit athletes choose a buff 3.4oz cable to start with.
- Our beaded rope is perfectly balanced to give you feedback to feel the rope so you know where the rope is around you, this awareness in turn gives you the best chance to learn, execute skills and improve your form.
JUMP ROPE BEGINNER FOUNDATIONAL SKILLS
Not sure where to start? Check out the key skills you need to get down before moving on to those more complex tricks!
HOW TO LEARN JUMP ROPE SKILLS AND TRICKS USING THE TOE CATCH
Check out the video guide here to see how you can best learn tricks and skills in jump rope!
The benefit of the toe catch in skipping is that it allows you not only drill tricks with multiple reps without causing too much fatigue but it also pauses the position of the rope to allow to analyse and then correct your hand and body positioning to execute tricks more accurately.
I will be launching more tutorials where this method of learning is used and applied to many other jump rope skills!
CONDITIONING, FOOTWEAR, ROPE CARE AND MAINTENANCE
Here I've compiled information relating to conditioning your body for skipping; what footwear I have used as well as the best ways to care and maintain your ropes to ensure you are set up for the long "jump"
TRICKS AND TUTORIALS
If you want to learn more tricks and skills then check out our growing library here!