In this section we look at general principles around cord length which is covered in Section 1 as well as specifics into cable length and weight for RX Smart Gear jump ropes (for double under learning and training) which is covered in section 2.
Introduction
Sizing your jump rope is important in order to make sure that learning and progression is effective as possible. We find that many people tend to use ropes that are too long for them which can hinder learning and proper jump rope form and cause unnecessary impact on the rope.
Section 1 - General Jump Rope Length Guidelines
Sizing a jump rope is impacted by personal needs and attributes which makes it tricky to have a sizing guide that is perfect for each individual. For example, arm length, workout objective and experience level can all impact the optimal rope length, not just your height.
The rope length guidelines below are for general rope work and if you are doing a mix of tricks, freestyle and cardio and are relative to your experience level. Where we use the terminology of of 'height plus' this is related to the length of rope in between the handles (not including handles). Where we talk about rope length in relation to a part of the body, this is measured by stepping on the centre of the rope with one foot, bringing the feet together and then pulling both handles up so you can see where the length of rope ends in relation to your body (see video below). Where we talk about skill level, in order to be at intermediate level, I would expect basic bounce to be low and smooth and for the user to have a few beginner skills under their belt (such as basic crosses, leg crosses and basic footwork variations) as well as decent arm and hand positioning (see form guide here) which is further improved by shortening the rope!
Please note that everyone has different body shapes and objectives and so these are only rough guidelines, you need to see what you are comfortable with once you get started but all efforts should be made to shorten rope length over time to improve technique and efficiency of rope movement. Only cut the rope once you think it is a length that is suitable and comfortable for your own personal needs and objectives.
Beginner - rope length in between the handles should be around your height plus 3ft / bottom of handles are no higher than lower chest / this allows plenty of room for error. This length is only a starting point and all efforts should be made to go shorter. If you can, then shorten the rope more than this if you notice that you have excess rope above the head and below the feet as you start jumping. Ensure you shorten the rope further as you progress in your jump rope journey which will help with your form. I would expect users to shorten their ropes more towards the intermediate length within their first 1-2 months of jumping.
Intermediate - rope length in between handles should be around your height plus 2ft / bottom of handles are no higher than waist line / this allows some room for error and enough to learn skills - this length will start to improve the rope efficiency and your form as there will be less excess rope. It will also force the user into the more optimal compact position which is elbows back, wrists next to the hips and palms facing out.
Advanced - rope length in between handles is around your height plus 1ft / bottom of handles are no higher than hips / this means no margin for error but skills can all be performed with optimum efficiency. The rope is much more efficient and aerodynamic and with less rope excess, the rope is going to impact the ground far less and move faster through the air. Not many people will be using a rope at this length as is more for the application of speed jumping and competition.
Note - you can shorten progressively between these length guidelines and I would advise against doing a large change in rope length, rather small progressions as you feel comfortable.
If you are an experienced jumper or have a rope you are already comfortable with, then measure your current rope or choose a length you know works for you if that is your personal preference.
In addition, with time and as you jump more consistently, you will likely have more than one rope where one of ropes is very strict on length so you can perform certain skills efficiently and at speed. Whilst the 2nd rope may have 3-5 inches extra length which you can use for training new skills that you are less proficient at. Having a main rope and training rope is something which regular freestyle jumpers tend to obtain in the course of their jump rope journey.
So if you are new to skipping, then start with a rope length that is around your height plus 3ft (in between the handles) to get a feel for jumping and then progress down in length once you start to learn new skills and are comfortable with the basics. Shortening the rope will help improve your form and efficiency in the long run even if it may feel uncomfortable at the start. I actually challenge users to shorten their ropes an inch or 2 more than they think to get them to progress to that intermediate level length sooner rather than later.
For most applications in freestyle jumping, having a middle ground between efficiency and room for error is most common and as you progress most freestyle jumpers will be at around the height plus 2ft mark allowing performance of wide variety of skill types including wraps, double unders, releases, etc. You will see some extremely proficient freestyle jumpers have ropes much shorter than this!
Note - if you want to go faster and do faster mic releases, then shorter ropes will help with this!
If you are focusing purely on double unders, you may want some more room for error as explained more below.
RX Smart Gear users and prospective buyers should read the below as we have a slightly amended sizing progression table to factor in the specific focus on double under learning and training, see details below:
Section 2 - Guidelines for RX users (specifically for CrossFit double unders):
In this section, we detail the RX Smartgear sizing principles for beginners who are starting out but also considerations and the benefits on progressing to shorter cable lengths from this starting point.
See below video as an introduction to the RX sizing guidelines for beginners:
For beginners, the recommendation of height plus 3ft gives ample space above your head and under foot
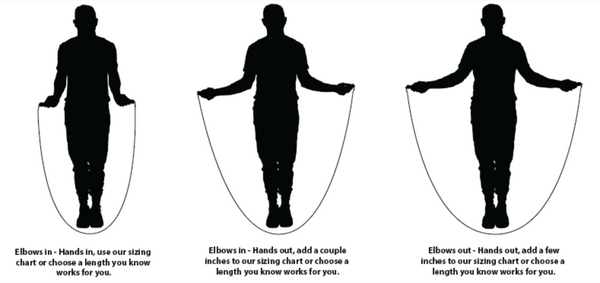
yet not so much as to force poor positioning and inefficient movement patterns. However, all efforts need to be made to bring your hand positioning in closer to the body and this will be achieved by shortening your cable length over time. A shorter rope length requires more compact positioning, which reduces fatigue in the larger muscle groups as well as produces a faster cycle rate per rotation. In essence, a shorter rope will allow you to perform more work faster with less energy expended. The diagram to the left below shows the kind of compact form you should be aiming for - elbows back, wrists in and palms out:
If you have compact form like this, you will likely need to go for a shorter rope as well. The aim is to get to this type of form with time as it is far more efficient and will lead to more DUBs more easily!
RX Sizing Progression table:
See below for how we recommend RX users progress as they become more experienced with their unbroken double unders and general form:
(Beginner) = height + 3 feet
(Intermediate) = height + 2.5 feet
(Advanced) = height + 2 feet, less room for error
(Advanced+) = height + less than 2 feet, which are performed by only a few athletes, not many.
If you are an experienced jumper or have a rope you are already comfortable with, then measure your current rope or choose a length you know works for you.
If you are unsure on the length and are a beginner with double unders, the chart below provides recommendations to start with.
Feel free to contact us at jump@doperopes.co.uk if you want to discuss cable length options in more detail!
Note - recommendations can sometimes change if RX make changes and updates to their product mechanics or due to user testing/feedback. However these will be marginal changes, if any, and are unlikely to alter your jump rope experience!
RX Cable Weights
The below is only relevant when purchasing RX Smartgear Jump Ropes
The RX Smartgear method focuses on starting with a heavier weighted cable which allows you to develop timing and technique for your double unders. When turning heavier weights you have better feel and feedback from the cable and simultaneously builds stamina. Once you are turning consecutive DUs, you then work your way down to lighter cables. With the technique and timing learned from the heavier rope, you will then be able to turn an even greater number of DUs with the lighter cables. See more detailed RX Smartgear cable weight descriptions and recommendations below:
Hyper 1.3 – NOT RECOMMENDED FOR BEGINNERS
Aircraft grade cable with PVC coating. Our lightest offering weighing only 1.3 ounces for a 9 foot length (excluding handles). Most comparable to traditional speed cables. The PVC coating does not retain memory and therefore uncoils nicely. This cable can produce the fastest cycle rate therefore the athlete must be extremely proficient at double unders. Recommended for advanced jumpers who can already turn 75+ double unders.
Ultra 1.8 – NOT RECOMMENDED FOR BEGINNERS
Aircraft grade cable with PVC coating. Our second lightest cable weighing 1.8 ounces for a 9 foot length (excluding handles). The Ultra 1.8 is considered our “hybrid speed cable” due to its light nature while offering more feedback to the athlete. The increased resistance allows the athlete to turn the Ultra 1.8 cable at a slightly slower cycle rate than the Hyper 1.3 yet triple unders are still plentiful. Recommended for advanced jumpers who can already turn 60+ double unders.
Elite 2.6 – IDEAL FOR INTERMEDIATE TO ADVANCED
Aircraft grade cable with PVC coating. Our mid range weighted cable weighing 2.6 ounces for a 9 foot length (excluding handles). Our most all around utility cable offering a nice blend of light weight with increased feedback and response while it’s rigidity maintains a nice “horse shoe” shape while in motion. Recommended for jumpers who can already turn 50+ double unders.
Buff 3.4 – IDEAL FOR BEGINNERS TURNING LESS THAN 50 D/Us. IDEAL FOR ADVANCED LOOKING TO INCREASE INTENSITY.
Aircraft grade cable with PVC coating. Our third heaviest cable weighing 3.4 ounces per 9 foot length (excluding handles). Our Dual Threat cable which provides tremendous feedback allowing the athlete to jump with a broader range of tempos from very slow to super fast. Ideal for beginners to gain a better feel for timing while jumping at slower tempos. Also a fantastic training cable for advanced jumpers looking for greater resistance and intensity in their training.
EVO - Speed Metal - (RECOMMENDED FOR ADVANCED ONLY)
Aircraft grade cable without coating. Our lightest cable offering. Most comparable to traditional speed cables. The uncoated wire provides a reduction in drag and cuts through the air with more ease. Recommended for advanced jumpers who can already turn 75+ double unders or are working on triple unders.
EVO - Heavy Metal - (RECOMMENDED FOR ADVANCED ONLY)
Aircraft grade cable without coating. The Heavy Metal cable offering weighs just mere ounces more than the Speed Metal cable. Heavy Metal is our secret weapon for triple unders and quadruple unders due to its perfect balance of weight and rigidity that provides essential feedback to the athlete. Recommended for advanced jumpers who can already turn 60+ double unders or are working on triple unders.
Choosing a selection results in a full page refresh.